Picture this: You’re sitting in your favorite nail salon, scrolling through Instagram, and suddenly you spot it—a set of nails that look like they’re on fire. Not just red polish, but actual flames licking up from the tips. You feel a jolt of excitement. That’s flame nail art, and it’s not just a trend—it’s a statement. If you’ve ever wanted your manicure to say, “I’m bold, I’m fun, and I don’t play it safe,” this is your moment.
What Is Flame Nail Art?
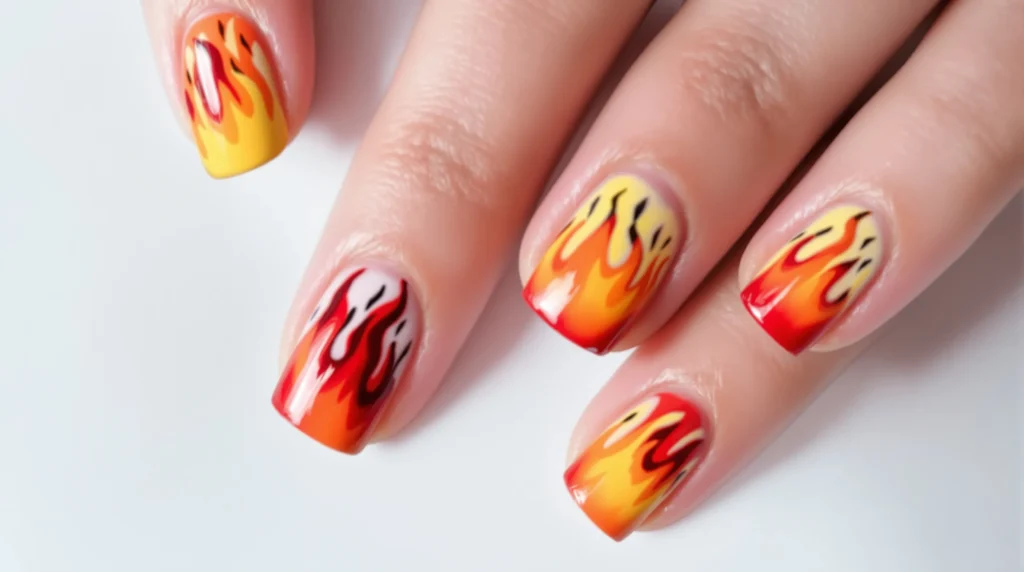
Flame nail art is exactly what it sounds like: designs that mimic the look of fire on your nails. Think bright oranges, reds, yellows, and even neon greens or blues, all shaped into flickering flames. Some people go for a classic hot-rod look, while others experiment with pastel flames or metallic finishes. The result? Nails that look like they could set the world on fire—figuratively, of course.
Why Flame Nail Art Is Everywhere Right Now
Let’s be honest: plain nails are fine, but sometimes you want something that turns heads. Flame nail art exploded on social media because it’s bold, playful, and surprisingly versatile. Celebrities like Kylie Jenner and Billie Eilish have rocked flame nails, and the look has trickled down to salons everywhere. If you want a manicure that gets noticed, this is it.
But here’s the part nobody tells you: flame nail art isn’t just for the ultra-trendy. It works for anyone who wants to add a little heat to their look. Whether you’re into short nails or long acrylics, there’s a flame design that fits your style.
How to Get Flame Nail Art: DIY or Salon?
If you’re crafty with a nail brush, you can try flame nail art at home. All you need is a steady hand, a thin nail art brush, and a few polishes in fiery shades. Start with a base color, then use the brush to paint wavy, pointed shapes that look like flames. Don’t worry if it’s not perfect—flames are supposed to be wild and unpredictable.
But let’s be real: not everyone has the patience (or the time) to paint tiny flames on ten fingers. That’s where your nail tech comes in. Most salons now offer flame nail art as a design option. Bring in a photo for inspiration, and let the pros handle the details. You’ll walk out with nails that look like they belong on a magazine cover.
DIY Flame Nail Art: Step-by-Step
- Start with clean, shaped nails. Apply a base coat.
- Paint your nails with a base color—black, white, or nude work well.
- Using a thin brush, paint the outline of the flames with your chosen color.
- Fill in the flames with a second, brighter color for depth.
- Add highlights with a third color if you want extra dimension.
- Let everything dry, then seal with a glossy top coat.
Pro tip: If you mess up, dip a small brush in nail polish remover and clean up the edges. Nobody gets it perfect on the first try.
Flame Nail Art Ideas for Every Style
Here’s where it gets fun. Flame nail art isn’t one-size-fits-all. You can go classic or get creative. Here are some ideas to spark your imagination:
- Classic Red Flames: Red, orange, and yellow flames on a black base. Think hot rods and retro vibes.
- Pastel Flames: Soft pink, lavender, and baby blue flames for a dreamy, unexpected twist.
- Neon Flames: Electric green or hot pink flames that glow under UV light. Perfect for parties.
- Metallic Flames: Gold or silver flames for a futuristic look.
- French Tip Flames: Flames just on the tips, like a fiery take on the classic French manicure.
If you’ve ever felt stuck in a nail rut, flame nail art is your ticket out. Try something new, even if it’s just one accent nail.
Who Should Try Flame Nail Art?
Flame nail art isn’t for everyone, and that’s okay. If you love subtle, barely-there nails, you might find flames a bit much. But if you crave attention, love experimenting, or just want to shake things up, this trend is for you. It’s also great for special occasions—think music festivals, birthdays, or anytime you want your hands to be the life of the party.
Here’s the truth: I used to think flame nail art was “too much” for me. Then I tried it for a friend’s bachelorette party, and I’ve never gotten so many compliments. Sometimes, stepping out of your comfort zone pays off.
Tips for Making Your Flame Nail Art Last
Nothing kills the vibe faster than chipped nail art. Here’s how to keep your flame nail art looking fresh:
- Always use a base coat and a high-quality top coat.
- Wear gloves when doing dishes or cleaning.
- Moisturize your hands and cuticles daily.
- Touch up chips with a tiny brush and matching polish.
Small habits make a big difference. If you invest in your nails, they’ll keep turning heads for weeks.
Common Mistakes and How to Avoid Them
Let’s break it down. The most common mistake? Trying to rush the process. Flame nail art takes time, especially if you’re doing it yourself. Don’t skip the drying time between layers, or you’ll end up with smudges. Another mistake: using too many colors. Stick to two or three shades for a cleaner look.
If you’re going to a salon, communicate clearly with your nail tech. Show photos, explain what you want, and don’t be afraid to speak up if something looks off. You’re paying for a look you love, not just a quick polish.
Flame Nail Art: The Final Word
Flame nail art is more than a trend—it’s a way to express yourself. Whether you go bold or keep it subtle, you’re telling the world you’re not afraid to stand out. If you’ve ever wanted to try something new, now’s your chance. Grab your favorite colors, channel your inner artist, and set your nails on fire—in the best way possible.
Ready to try flame nail art? Your next manicure could be the hottest one yet.